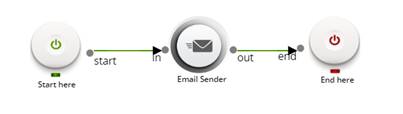
Email Sender
In Jiffy, an Email Sender node is used to send an email.
- Pre-condition:
Before using an Email Sender node in designing any task, the Email configuration must be defined.
1.1 Defining Email Configuration:
Do the following to define the Email configuration:- Login to Jiffy.
- Navigate to Task Design -> Configurations -> Email Configuration.
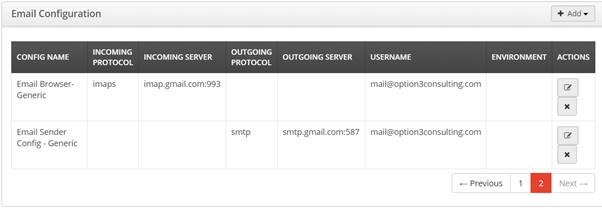
- Click on the Add button to define the configuration.
The following dropdown is displayed with two options:
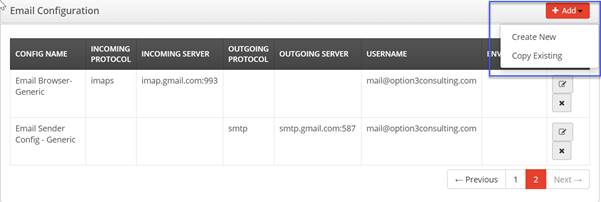
- Create New: Use this option to create a new Email configuration.
Do the following to add new configuration:- Click on the Create New button to display the display the Add Email Configuration window.
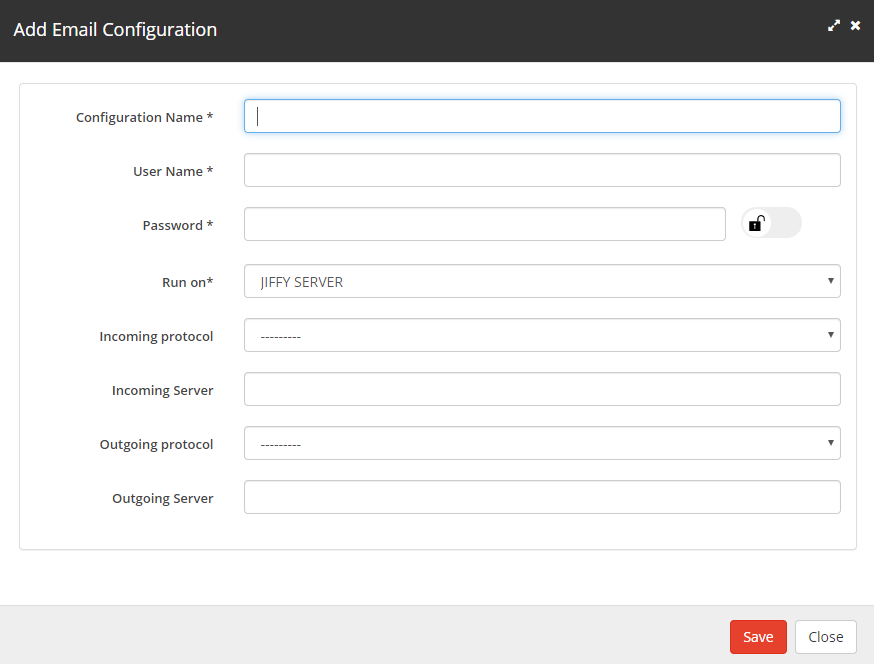
Specify the details for the following fields:- Configuration Name: Name to be provided for the configuration and the specified name is used in the Properties section of the node.
- User Name: The email id from which an email will be sent.
- Password: The password for the specific username.
- Run on: Specify from where the Email needs to be triggered:
- a. Jiffy Server: Email gets triggered from the jiffy server.
- b. Cluster: In case Jiffy server does not have internet connection or not able to access the specified website then the Cluster option can be used.
- Incoming Server: The server which is to be used for browsing emails.
- Outgoing Server: The server which is to be used for sending an email.
- Incoming protocol: imap / imaps can be chosen, imaps is more secure.
- Outgoing protocol: smtp / smtps can be chosen, smtps is more secure.
- Click on the Create New button to display the display the Add Email Configuration window.
- Copy Existing: Use this option to copy from the existing configurations that are defined earlier.
- Click on the Copy Existing button to display the Copy Configuration window.
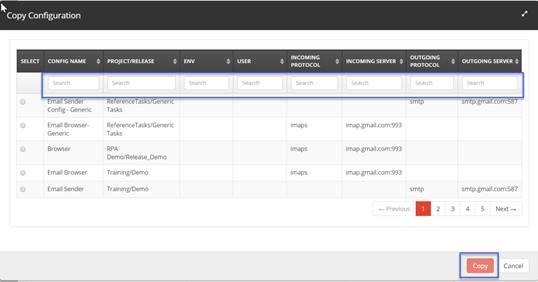
- Type the details of the required configuration in the above Search fields.
- Select the required configuration from the filtered list.
- Click on the Copy button.
- Click on the Copy Existing button to display the Copy Configuration window.
- Create New: Use this option to create a new Email configuration.
- Designing a Task Using an Email Sender Node:
Do the following to use an Email Sender node in a task:
- Use an existing task or create a new task based on the requirement.
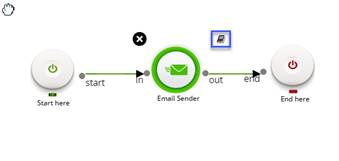
Note: Refer Create A Task for more details on how to create a task and how to open an existing task. - Drag and drop the Email Sender node from the Objects -> Email section and connect the nodes.
- Click on the Email Sender node and specify the properties:
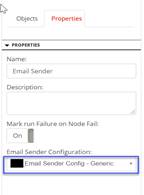
Add the following details:- Name: Name of the node. A default name is displayed in this field, which the user can edit according to the task and the intent of using the node.
- Description: A short note on the purpose of the node.
- Mark run Failure on Node Fail: When the Mark run Failure on Node Fail field is ON, if the node execution fails then the complete task execution is marked as fail.
- Email Sender Configuration: Select the required configuration from the Email Configuration dropdown. For more details click here.
- Click on the connector between the Start node and the Email Sender node.
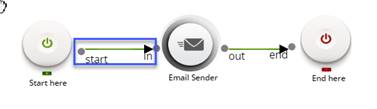
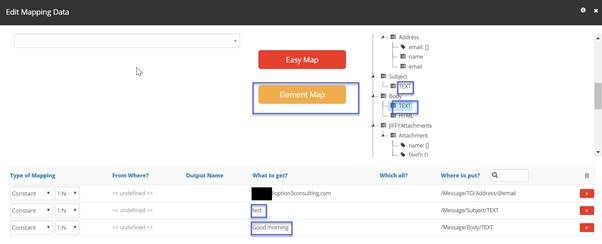
- Select the email tag under the To Address section and select Element Map.

Note: : Select the necessary fields needed to send an email, here: To Address, Subject, Body.
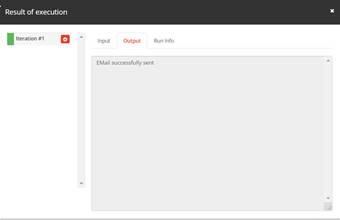
- Click on the Trail Run icon.
- Click on the book icon above the Email Sender node to display the Result of execution window of the Email Browser node.
- Use an existing task or create a new task based on the requirement.