Server Installation
Jiffy Server Installation in Linux:
Requirements:
Supported Operating System Versions:
The following OS versions are supported:
Pre-Conditions:
For further details on Hardware requirements, refer - Pre-requisites for Jiffy Server Installation Installing Jiffy Server in Linux: Step 1:
Step 2:
Follow the steps below if postgres database needs to be installed on the same server:
Step 3:
Run the following commands to modify the file ownership.
Step 4:
Switch to the jiffy linux username which was created during the Step1 and run the command below: Step 5:
Upgrading Jiffy Server from 3.2.x.y Onwards: Requirements:
Steps to upgrade Jiffy Server:
Execute the following commands to upgrade Jiffy:
Additional software requirements for 3.2.0.55:
Additional software requirements for 3.2.0.94:
Start Jiffy Application
Start webserver:
Run as root user
Start vault:
Run the following as Jiffy server user:
Start Jiffy core:
Run the following as Jiffy server user:
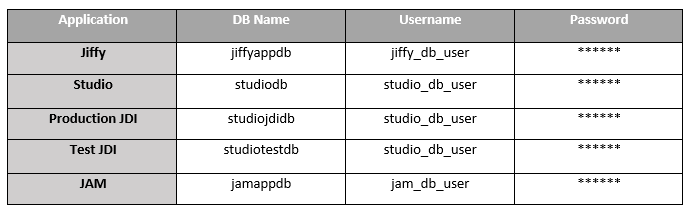
Index Default Postgres Database details:
Host: localhost Enable LDAP settings:
The following LDAP server details should be available as they are required during deployment:
Yum Package list used by Jiffy application:
The following Yum Packages are used by Jiffy:
Run as a Root User:
Run Steps 1, 2, 3 as a root user:
Follow instructions on the screen.
Follow the instructions on the screen.
Note: Update with the correct Linux username which was created during the Step1:
Run as a Non-Root User:
Note:
host:port localhost:5672
Give the same rabbitmq username and password which was given during Step1.
Follow the instructions on the screen.
Run as a Root User:
Follow the instructions on the screen;
Follow the instructions on the screen to complete the upgrade.
No additional requirements.
These are the steps to be followed to the start Jiffy application.
/opt/nginx/sbin/nginx
Note:
For intercom to work correctly, the jiffy user should have a unique email ID.
After logging into the application, please create a new jiffy application user.
Port: 5432