6. Miscellaneous

Timer
Timer node is used to add delays during execution by the time specified in the node.
REST API
In Jiffy, the REST API node allows the user to include the REST web services.
- Uses:
- REST API node is used to call API’s in web applications, instead of doing web automations.
- It is faster than the web automations.
- It runs in either jiffy server or client depending on the defined configuration.
Note: If the REST API input/output contains any file-type other than JSON/XML, the REST API node cannot handle it. To handle those scenarios, use python expressions
Example: Uploading file to Docube, Downloading file from Docube.
Note: The REST API node can be used either in an existing task or a new task.
- Pre-condition:
Before using a REST API node in designing any task, the REST API configuration must be defined.
- Defining REST API Configuration:
Do the following to define the REST API configuration:- Login to Jiffy.
- Navigate to Task Design -> Configurations -> REST API Configuration.
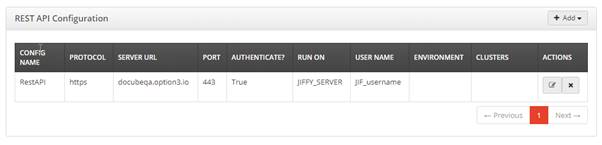
- Click on the Add button to define the configuration.
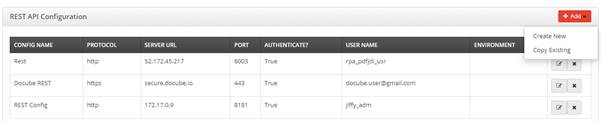
The following list box is displayed with two options:
-
Create New: Use this option to create a new REST API configuration.
Do the following to add new configuration:- Click on the Create New button to display the display the Add REST API Configuration window.
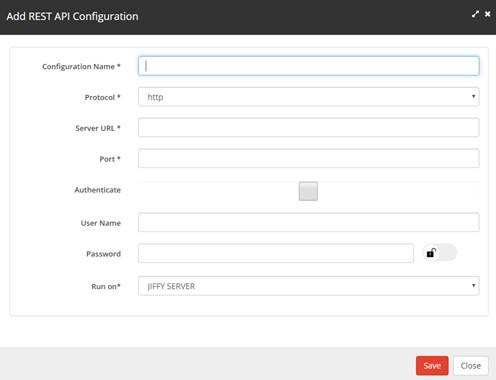
Specify the details for the following fields: - Configuration Name: Any name for identification.
- Protocol: The protocol is http or https according to the website.
- Server URL: Complete server URL for connecting to the website.
- Port: Port number of website where it is running. Use Port 80 for HTTP protocol in REST API and use Port 443 for HTTPS.
- Authenticate: It is an optional feature when a website must authenticate credentials, which are given in the configuration level.
- Username: Username for logging into the website.
- Password: Password for authentication, can be a secure key or constant. Select and drag the lock toggle button next to the password field to make it secure.
-
Run on: Specify from where the API needs to be triggered:
- Jiffy Server: API gets triggered from the jiffy server.
- Cluster: In case Jiffy server does not have internet connection or not able to access the specified website then the Cluster option can be used.
- Click on the Create New button to display the display the Add REST API Configuration window.
-
Copy Existing: Use this option to copy from the existing configurations that are defined earlier.
- Click on the Copy Existing button to display the Copy Configuration window.
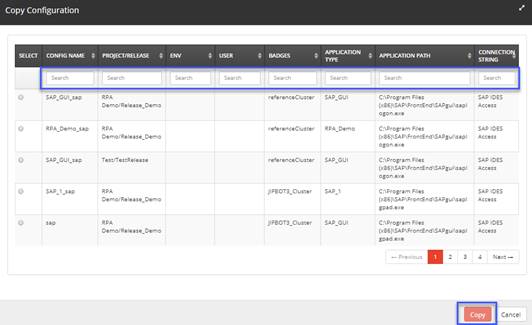
- Type the details of the required configuration in the above Search fields.
- Select the required configuration from the filtered list.
- Click on the Copy button.
- Click on the Copy Existing button to display the Copy Configuration window.
-
Create New: Use this option to create a new REST API configuration.
- Designing a Task Using a REST API Node:
- Use an existing task or create a new task based on the requirement.
Note: Refer Create A Task for more details on how to create a task and how to open an existing task. - Drag and drop the REST API node from the Objects -> Miscellaneous section and connect the nodes.

-
Specify the properties of the REST API node:
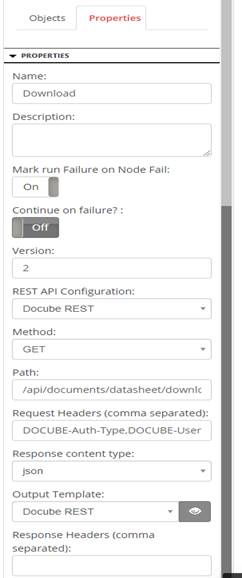
Add the following details:- Name: Name of the node. A default name is displayed in this field, which the user can edit according to the task and the intent of using the node.
- Description: A short note on the purpose of the node.
- Continue on no result?: When Continue on no result? field is ON, the task execution continues even when the database query returns no results. When Continue on no result? field is OFF,if the node fails, the execution will not continue to the next node.
- Configuration: Select the required configuration from the Configuration list box.
Note: The configuration is pre-defined in the Configurations screen. Refer Defining REST API Configuration section for more details. -
Method: It has four options to choose the method of the REST API:
- GET
- PUT
- DELETE
- POST
- Path: The Path is a unit of a REST API that the user can call.
The variable in the provided path can be passed from any previous node.
The variable name must be passed in the format of ${}.
For example: /api/documents/pathId?path=${path}
- Request Headers: Headers data for authenticating the API call. The user must give proper name and separate the given names with comma. This data is used for REST API input mapping.
Example:DOCUBE-Auth-Type,DOCUBE-User-ID,DOCUBE-Password,DOCUBE-Remember-Me
Note:The password cannot be accessed from the secure vault. The user must specify the password, or it must be passed from the previous node.

- Response Content Type: Select either JSON or XML option according to the REST API input/output.
- Input Template: Select the input template as JSON or XML according to the input format of the REST API. The structure of JSON/XML must be uploaded in Jiffy templates. Applicable only for POST and PUT methods.
- Output Template: Select the output template as JSON or XML according to the required output format of REST API. The structure of JSON/XML must be uploaded in Jiffy templates.
- Click on the Trail Runbutton.
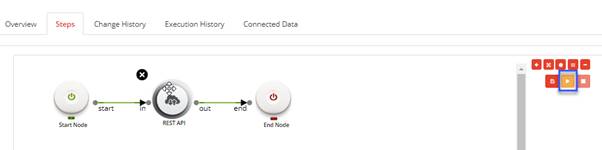
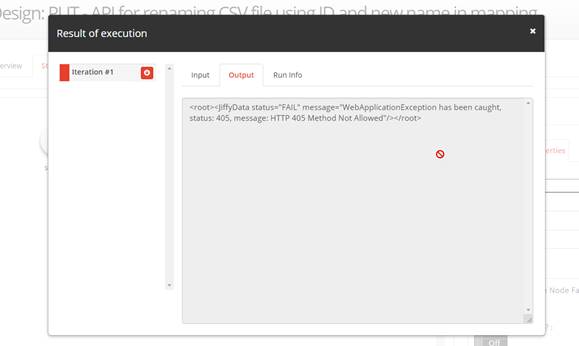
- Click on the book icon above the REST API node to display the Result of execution window of the REST API node.
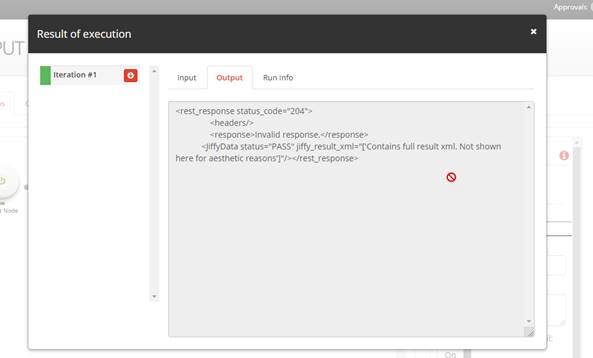
Note:If the REST API node fails to execute, then the respective error is displayed in the Result of execution window.
- If the user does not know the output format of the GET API, specify any of the XML or JSON template and then click on the Trail Run option.
-
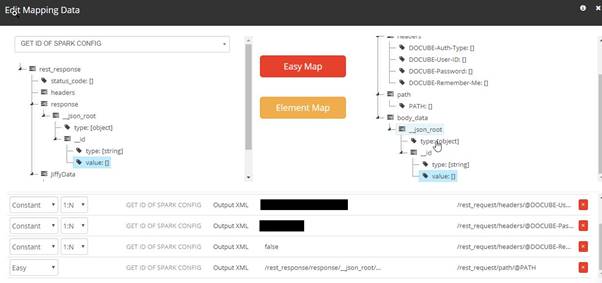
Copy the results from the Result of execution -> Output tab, clear data, and then upload to Jiffy Templates (as XML or JSON templates).
For example:-
Select all the data from the Output tab of the Result of execution window. Use only the following data:
<__id type=“string” value=“2d086600-339e-47fb-af76-19c3aa8c4f74”/>
Upload the copied code to the Templates (XML or JSON based on the requirement.)
-
Select all the data from the Output tab of the Result of execution window. Use only the following data:
- The GET API result can be mapped to the next nodes.
Note: It is not possible to use the REST API node to update multiple DB columns. In such cases, REST API has to be used.
File Transfer
FTP node allows the user to SEND files to given location and RECEIVE files from given location.
The following needs to be selected in properties
- Configurations needs to be updated in Task Design -> Configurations.
- Mode : MODE set to SEND is used to send and save the XML template selected in INPUT XML TEMPLATE with name and location mentioned at REMOTE PATH location.
- MODE set to RECEIVE is used to receive a file to OUTPUT XML TEMPLATE from REMOTE PATH location. Filename including path needs to be given in location
The file transfer node in Jiffy can be used to transfer files in different modes. This video shows how it works.
Kafka Producer
Kafka Producer component posts messages to Kafka Topics. It accepts XML/JSON templates as input, if the template selected is XML, Jiffy converts it into JSON before publishing to the Topic.
PDF Reader
PDF Reader node is used to read the contents from a text PDF. The below steps need to be followed:
- Configuration: Select a PDF configuration from the drop down. Refer to Task Design -> Configuration for setting a Document configuration
- Mappings: Provide the Location where PDF is saved in the input mapping section. The PDF files should be placed in the Windows server where Jiffy service is running. Refer to Mapping section for details on providing input mappings.
- Template: Template flag need to be turned on/off. In case an XML Template has been created, turn “Template” flag to ON.
- Template Tag: Provide the Template tag that is saved by creating the template Refer Repository - Document Templates for more information
Obtaining PDF data with Template Flag as OFF
When the Template Flag is OFF, the data can be mapped from the segment (eg: /root/pdfoutput/pdfdata/document/pages/page/lines/line[19]/segments/segment[2]/@text). The segment and line number would depend on the PDF XML output.
Obtaining PDF data with Template Flag as ON
As a pre-requisite, the Template tag need to be provided for matching the template with the PDF.
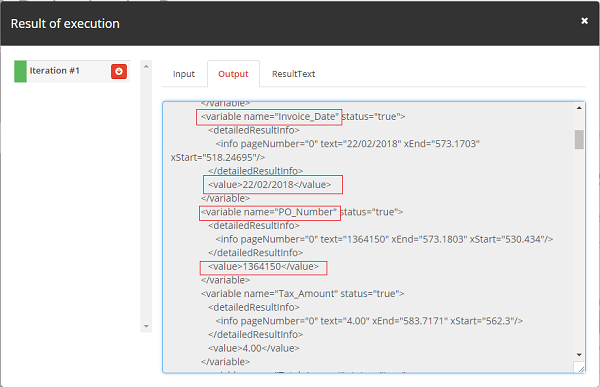
Jiffy would validate the PDF document against each template with the same tag. Once a matching template is obtained, Jiffy would mark the Output variables and the table list data in the Output section, along with the XML Data. The output variables can be mapped to further nodes. ie. The data which is read from the PDF can be passed to the subsequent nodes.
Please refer to Repository - Document Template for more information.
Output Result Display
The ResultText would contain the PDF with green boxes which indicate the data that has been captured using the template. The Output would contain the XML file based on the PDF template.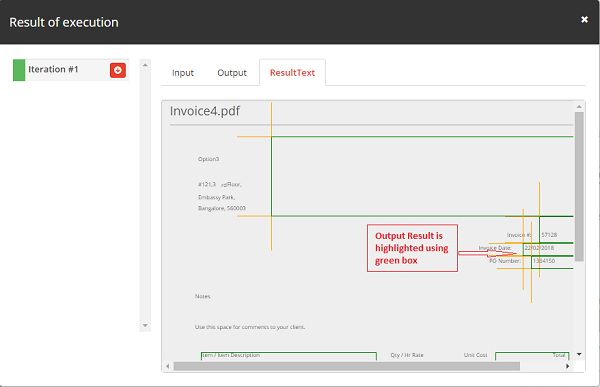
Note: Keep a track of the variable names you assign and use them accordingly. Incorrect uses will lead to malfunctioning of the task.
DOCX Node
A DOCX node can be used to read data from a DOCX file. Here is how you can configure the DOCX reader to read word documents.
Expression Node
Expression node is used for calculations. There are many expressions already stored on the Jiffy server. In addition to those, you can also create your own expressions. This video shows how to use the expression node.
Now there are Two new nodes introduced to handle unattended bots.
LOGIN & LOGOFF Node
Login node and log off node are the UI nodes which are used to login to the machine automatically, start the jiffy service on the machine provided on the node and log off from the machine respectively.- Uses:
- Login & Log-off node is used to login to the Remote desktop machine without any manual intervention to execute the task and logoff from Remote desktop machine after the task execution.
- This allows the user to bring up the machine only during execution and bring it down after the execution is completed without any manual intervention.
- This will act as a virtual user logging in to the respective machine.
- Pre-condition:
Before using the login & logoff nodes in the jiffy task, make sure that valid user credentials are provided during the machine configuration (Machines Section in the Bots drop-down).
- Designing a Task Using a Login & Logoff Node:
- Use an existing task or create a new task based on the requirement.
Note: Refer Create A Task for more details on how to create a task and how to open an existing task. - Drag and drop the Login & Logoff nodes from the Objects -> Data Sources section and connect the nodes.

- Specify the properties of the DB node:

Add the following details:- Name: Name of the node. A default name is displayed in this field, which the user can edit according to the task and the intent of using the node.
- Description: A short note on the purpose of the node.
- Mark run Failure on Node Fail: When the Mark run Failure on Node Fail field is ON, if the node execution fails then the complete task execution is marked as fail.
- Run with User config?: This functionality is now deprecated.
- Continue on no result?: When Continue on no result? field is ON, the task execution continues even when the database query returns no results. When Continue on no result? field is OFF,if the node fails, the execution will not continue to the next node.
- Clusters: User can add cluster/s in this field, under which the required machine/group of machines is present with the necessary data.
Note: When multiple machines are grouped under the cluster, the login node will log in to all the machines of the cluster and the log off node will log off from all the machines of the cluster.
- 3.1 Adding User credentials to a Machine in the Cluster The user can view machine or group of machines in a cluster from the Machines Section in the Bots drop-down.
- Navigate to Bots -> Machines.

- Click on the specific machine/machines which are added to the cluster/s.

- Inside the specific machine/s, give valid username and password which is used to login to the machine.

- User can provide username and password in the Username and Password field as 3 different types:
- i. Normal Username and Password:
Type the username and password and click on the Save button.

- ii. Username and Password in “Secured Format” using Secure Vault data:
Click and drag the Unlock option to the right side to view a Search icon.

Note: When the Search icon is clicked, the secure keys available for use are displayed in the Search dialog box. For more details on how to add secure keys, click here. - iii. Username and password in “Secured format” using “CyberArk data”
Click and drag the Unlock option to the right side to view a Search icon.

Note: When the Search icon is clicked, the CyberArk keys available for use are displayed in the Search dialog box. For more details on how to add secure keys that are CyberArk enabled, click here.
- i. Normal Username and Password:
- Click on the Trail Runbutton.

- After successful completion of execution, the login and the log off nodes turns green and the execution data is displayed in the Output tab of the Result of execution dialog box. (Click on the Book icon to view the Result of execution dialog box.)

- For login node the output message is of the following format.

- For log off node the output message is of the following format.

- Use an existing task or create a new task based on the requirement.
- Troubleshooting:
When secured username and password are provided as machine credentials, the user must ensure the JiffyURL in the configuration file of jiffy windows service is valid.
In case it is not, do the following:
- Go to the configuration file in the below path:
C:\Program Files (x86)\Option3\JiffyWinService\JiffyWindowsService.exe.config

- In the configuration file, correct the JiffyURL to point to the Jiffy Server where the task is running.

- Restart the client machine.
- Go to the configuration file in the below path:
- Use Cases of Login & Logoff Node:
The user can use the login node and the log off node in a task in the following scenario:
- Single task: User can design a task using login and log off node in the same task when a single task is executed in the RDP.
- Multiple Tasks: When there are multiple tasks to be executed, as a best practice, design the login and log off nodes as separate tasks.
When a task is executed, the login node starts the jiffy service on the provided cluster, executes the task and the log off node stops the jiffy service and the consecutive machine logs off successfully.

- Use an existing task or create a new task based on the requirement.