Validator
The Validator node gets the inputs from the previous nodes and validates them based on the defined conditions.
Validator node is used to validate data and then proceed with further execution of the task.
If the validation fails, the user can specify whether further execution of the task is required or not in the Properties section.
Multiple levels of validations rules can be added using constant values/Variables/expressions and different operators like =, !=, <, >, <=, >=, like, AND, OR etc.
Note:
- Validator node cannot be used with any of the SubTask nodes.
- Only Validator node can connect to a node that is already connected to another node.
- Uses:
- To implement any number of validations required for a task execution.
- Helps in validating data across different applications.
- User can specify AND, OR conditions for multiple rules.
- Nested validation can be provided.
- Designing a Task Using the Sub Task Nodes:
- Use an existing task or create a new task based on the requirement.
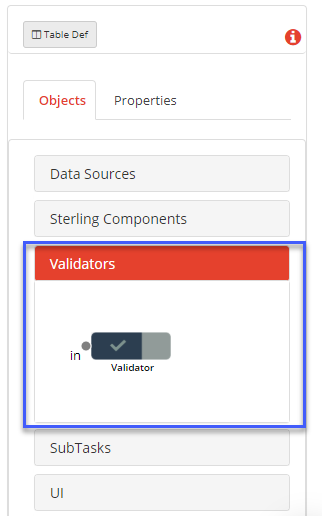
Note: Refer Create A Task for more details on how to create a task and how to open an existing task. - Drag and drop a Validator node from the Objects ->Validators section and connect the nodes.
- Click on the Validator node and specify the properties:
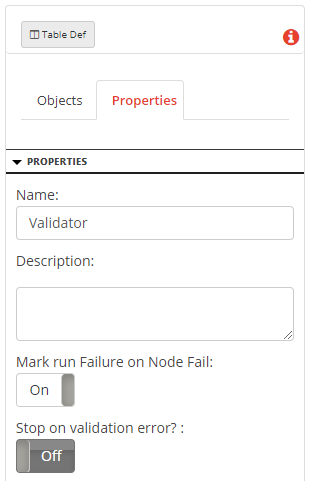
Add the following details:- Name: Name of the node. A default name is displayed in this field, which the user can edit according to the task and the intent of using the node.
- Description: A short note on the purpose of the node.
- Mark run Failure on Node Fail: When the Mark run Failure on Node Fail field is ON, if the node execution fails then the complete task execution is marked as fail.
- Stop on Validation error?: Stops the further execution of the task if there is a validation error.
- Connect the output of the node that needs to be validated to the input of the Validator node.
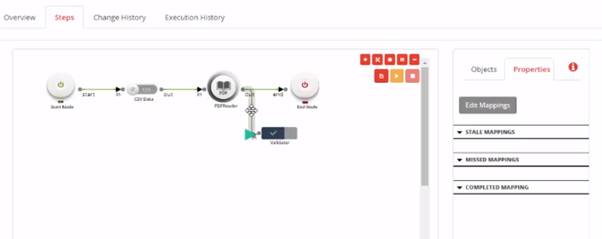
- Make necessary mappings needed to the Validator node by clicking on the connector that connects to Validator node to a previous node.
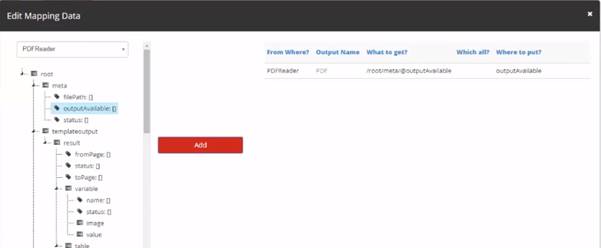
- Select the required tag from the left-hand side section in the Edit Mapping Data window.
- Click on the Add button to add the mapping data.
- Double-click on the Validator node to display Edit Validations dialog box.
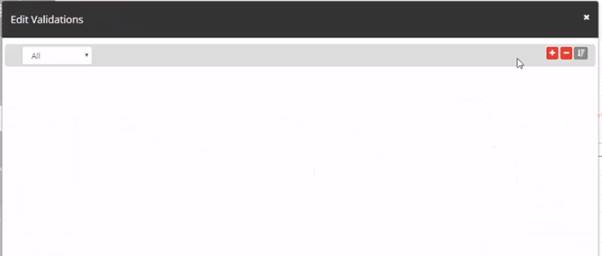
- Click on the + button to add the rules for validations.

- Click on the below highlighted field to display the additional three field on the top of the Edit Validations dialog box.
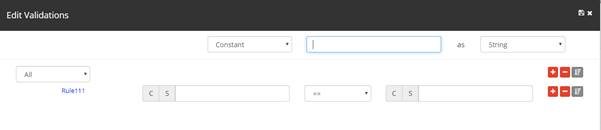
- Select any one of the following options from the first field.
- Constant
- Variable
- Expression

- Select the Variable option from the first field and then select the required variable from the Select a Variable dropdown.
Note: The variable can be a String, Boolean, Number, or Date. Select the required option from the field next to the Select a Variable dropdown.- Similarly, the user can select any one of the other two options (Constant and Expression)
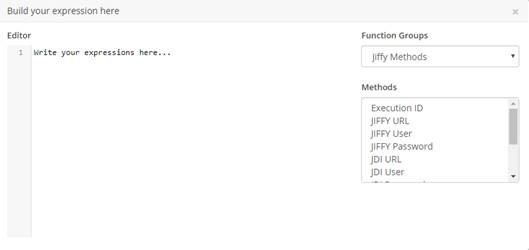
Note:If the selected option is an Expression, type the expression by clicking on the below highlighted field.

Write the expression in the Build you expression here window.
If the If the selected option is a Constant, type the constant.
- Similarly, the user can select any one of the other two options (Constant and Expression)
- Select any one of the following options from the first field.
- Select the required operator (=, !=, <, >, <=, >=, !has, has) from the below highlighted field.
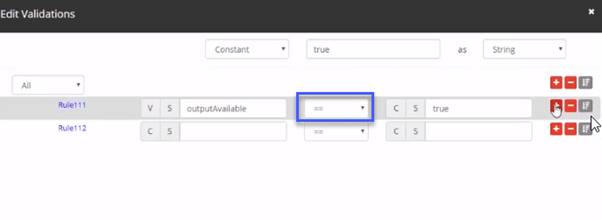
Note:The user can add multiple conditions for validation by adding multiple rows. - Select the All or Any option from the following highlighted field based on the requirement.
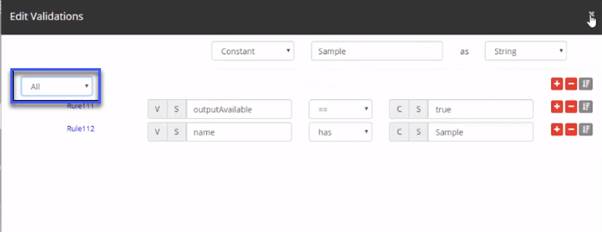
Note:All option (to specify AND condition) is used when all the defined conditions are to be satisfied during validation for a task to be executed. Any option (to specify OR condition) is used when the task needs to be executed if any one of the defined conditions are satisfied. - Click on the Trail Run icon to execute the task.
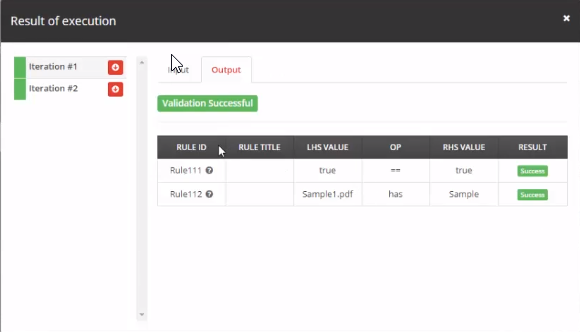
Note:Validation will be successful only when all the defined rules are satisfied. - 12. Click on the Book icon above the Validator node to view the Result of Execution dialog box.

- Use an existing task or create a new task based on the requirement.