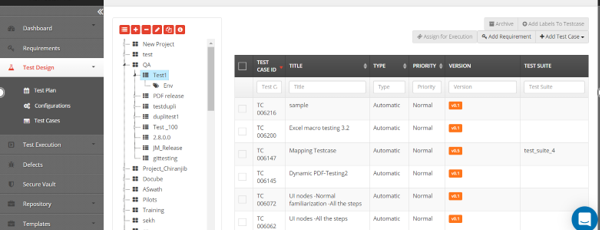
Once the _Project_ is defined by admin user, any number of Releases can be added under that Project.
From Jiffy main screen, navigate to
Task Design -> Task Plan. Select a Project and click on Add Release button at the top.

Release Name, Start date, End Date and Description can be edited from Task Plan for an existing release. From Jiffy main screen, navigate to
Task Design -> Task Plan. Select a Release and click on Edit Release button at the top.

User is allowed to take a copy of an existing Release using duplicate button. This new Release will be created under the same project. Also, the new Release will have all the environments and tasks same as original Release. From Jiffy main screen, navigate to
Task Design -> Task Plan. Select a Release and click on Duplicate Release button at the top.

To archive the release, click the
– button (
Archive Release button) and then click the
OK button.

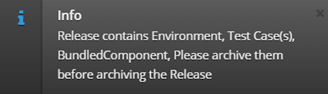
A user cannot archive a release in the following cases:
- When there is an environment connected to a release (both active and inactive).
- When there is a bundled component connected to a release.
- When there is a testcase in the release.
When a user tries to archive a release that does not satisfy the above conditions, the following message is displayed:
1.
Create a New task - To Create a new task in Jiffy, select the Release under which task needs to be created. Click on Add Tasks at the top, it will take the user to task design window.

+
Add From Repository - To Add a task from Repository to the Selected Release, select the Release under which task needs to be created. Click on Add from Repository at the top, it will take the user to Task Repository window from which user can choose the Task to be added.

Navigate to the Release from which task needs to be archived, select the task and click on Archive at the top.

This helps to assign a set of tasks to a user so that user will get the notification to execute all those tasks on next login. Navigate to the
Function -> Release -> Environment that has the tasks to be assigned for execution, select the tasks and click on
Assign for Execution at the top.

A task which is checked out from task repository and being modified under Release can again be reloaded with what is available in repository. Navigate to
Function -> Release -> Environment and select the task to be reloaded, click on Sync with repository.
The below message appears

1.
Override Changes: Overrides the task with the changes from the task repository.
Retain Changes: Will not sync with repository and will retain the latest changes of the task
Labels are used to logically group the tasks. Tasks that are spread across different environments under a Release can be grouped under one label. Tasks which are grouped under one label and under an environment can be executed in one go.
Before assigning tasks to a label, the Labels names need to be created under repository. Please refer to Repository -> Labels to get more details on Labels.
Navigate to
Function -> Release and select the tasks to be assigned to a label. Click on Add Labels to Task button on top. Provide the Label name
