8. G-Suite
The following are the list of G-Suite nodes supported by Jiffy:
- Google Calendar
- Google Sheet
- Google Drive
With the Google G-Suite Activities Package, the user can create and modify Google Calendar events, manage Google Drive files, read & send GMail messages, create new Google Sheet spreadsheets, and Google Docs documents.
- Pre-requisites
- Python 2.6 or greater
- The pip package management tool
- Google account
- Setting up G-suite
Before using the Google G-Suite Activities Package, configure the applications using the Google Cloud Platform.
There are two configuration steps:
- Enable APIs - This step enables automation by granting API access to your Google G Suite applications.
- Create credentials - This specifies the authentication type used to interact with your enabled APIs.
2.1 Enable APIs:
Follow the steps listed below to enable your APIs.- Sign into the Google Cloud Platform using your personal, work, or school Google G Suite account.
- In the top menu bar, after Google Cloud Platform, select the project you want to use for your automation project.
If there is no existing project, create one by following the Creating and Managing Projects instructions in the Google Cloud documentation.
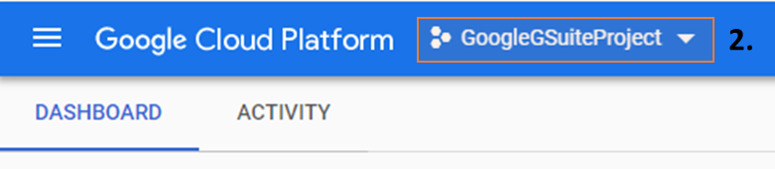
- Click on the menu in the top navigation bar.
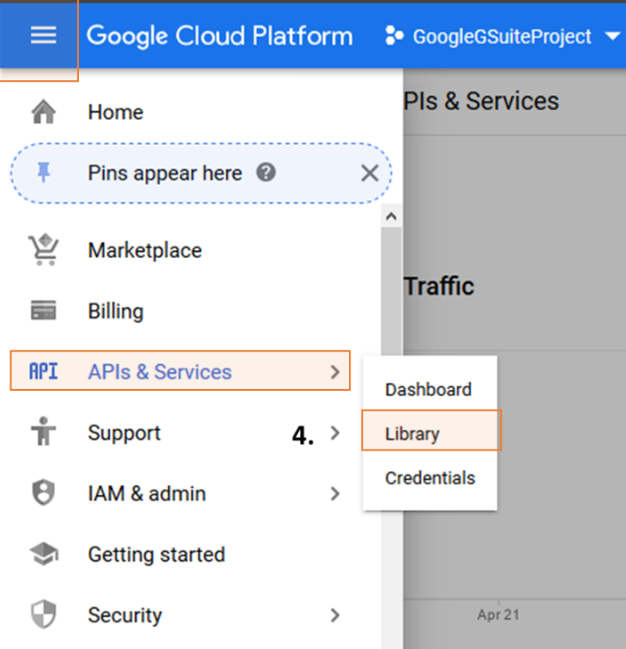
- Hover over **APIs & Services** link (showing a menu of options) and select the **Library** option to open the **API Library** screen.
- From the API Library, go to the **G Suite** section.
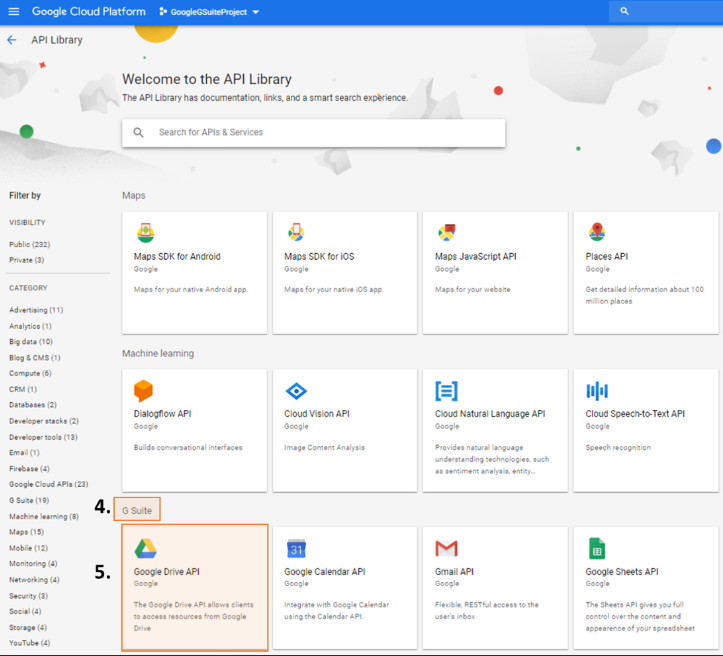
- Click the application you want to enable APIs for (example, *Google Drive API**).
- The APIs supported by the Google G-Suite Activities Package are:
- Google Drive API, Google Calendar API, Gmail API, Google Sheets API, and Google Docs API.
- From the selected application API page, click on the **Enable** button.
- Repeat steps 5-6 to enable APIs for the remaining applications (Google Calendar API, GMail API, Google Sheets API, and Google Docs API).
2.2 Create credentials:
Follow the steps listed below to create credentials in order to access the enabled APIs for your project (APIs & Services).- From the **APIs & Services** screen (**Google Cloud Platform**> **Project** > APIs & **Services**), click on the **Credentials** option in the left-hand navigation panel.
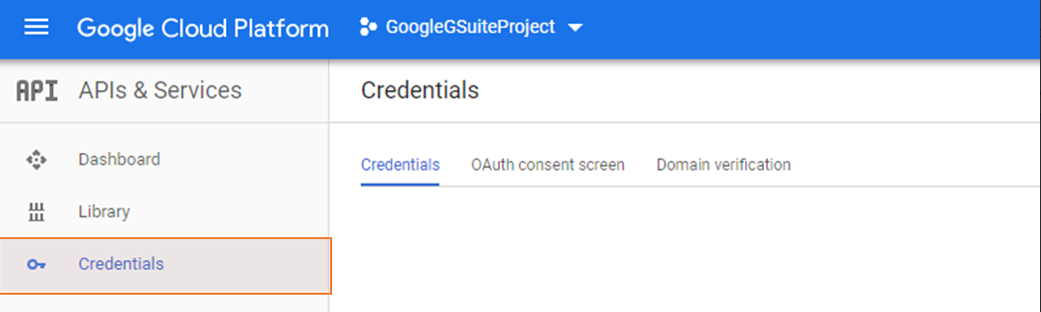
Result: The Credentials screen is displayed. - Click on the Create credentialsbutton and select the type of credentials used for the application.
Note: Contact your IT department to determine the type of credentials that should be used for your project. For more information about the differences between the credential types, see Authentication Overview in the Google Cloud documentation.
For information about each credential type, see the details below:
Credential Type Description API key An API key is the simplest authentication mechanism but can be used only with the Google Sheets activity. For more information about API Keys, see Using API Keys in the Google Cloud Documentation. OAuth client ID The OAuth Client ID method works with all GSuite services, however it\'s recommended for attended automation because user consent is required before the robot can access to your Google account (for more information, see User consent. For more information about OAuth client ID, see Using OAuth 2.0 to Access Google APIs. For step-by-step instructions, see Setting up OAuth 2.0 in the Google Help documentation. Service account key A service account key is a special type of Google account that belongs to your application instead of to an individual end user. Your application calls Google APIs on behalf of the service account, so users aren\'t directly involved. For more information about Service account keys, see Understanding service accounts in the Google Cloud Documentation. - Follow the applicable instructions (listed below) to add your selected credentials.
- API key
- OAuth client ID
- Service account key
- Python Packages
Note: The following are the list of python packages that must be installed during Jiffy Client installation.
Node Python Module/Packages Google Sheets - google-api-python-client
- google-auth
- google-auth-httplib2
- google-auth-oauthlib
- googlecloud
- graphviz
- httplib2
- oauth2client
- oauthlib
- gspread
Google Calendar - pickle
Google Drive - google-api-python-client
- google-auth
- google-auth-httplib2
- google-auth-oauthlib
- googlecloud
- graphviz
- httplib2
- oauth2client
- oauthlib
- G-suite Nodes
The following are the Gsuite nodes available:
Google Calender
Google Calendar is a time-management and scheduling calendar service developed by Google. Google Calendar allows the users to create and edit events. Reminders can be enabled for events, with options available for type and time. Event locations can also be added, and other users can be invited to events. Click here for more information on the Google Calender node.
Google Drive
Google Drive is a cloud-based storage service that enables users to store and access files online. The service syncs stored documents, photos and more across all the user devices, including mobile devices, tablets, and PCs. Click here for more information on the Google Drive node.
Google Sheets
Google Sheets is a spreadsheet program included as part of a free, web-based software office suite offered by Google within its Google Drive service. Click here for more information on the Google Sheets node.
- G-suite Node Properties
Drag any one of the G-suite nodes onto the Design canvas and click on it to view the Properties tab.

- Name: Type the name of the node. A default name is displayed in this field, which the user can edit according to the task and the intent of using the node.
- Description: A short note on the purpose of the node.API key
- Mark Run Failure on Node Fail: When the Mark run Failure on Node Fail field is ON, if the node execution fails then the complete task execution is marked as fail.
-
When the Mark run Failure on Node Fail field is OFF, if the node execution fails then the complete task execution is marked as pass.
- Continue on Failure: When the Continue on Failure field is ON, even if the node fails, the execution will continue to the next node.
-
When the Continue on Failure field is OFF, if the node fails, the execution will not continue to the next node.
- Clusters: User can add cluster/s in this field, under which the required machine/group of machines is present with the necessary data.
- Run Mode: The user can select any one of the following options from the Run Mode drop-down:
- Run if locked: The task runs even if the machine is locked.
- Unlock and run: Unlocks the machine and runs the task.
- Lock After Run: Locks the machine after the node execution.
- Variables: Click on the Variables button to select the input variables and to create an output variable.
- To create an output variable, go to Output Variables tab.
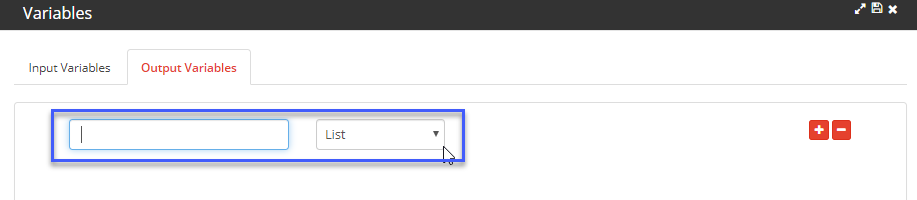
- Type the required name of the output variable in the first text box and then select the type of the output variable from the drop-down. The output variable type can be either List or Table.
- To create an output variable, go to Output Variables tab.